

Making my cosplay and putting it out there, with the occasional random dresses too!
Showing posts with label misc. Show all posts
Showing posts with label misc. Show all posts
Thursday, January 7, 2016

Sunday, December 28, 2014
Polka Dot Pajama Pants
I've been pretty bored all day, so I thought I should do something with my life and sewed up a pair of PJ's. Yupp, this is what I do with my life :P
Anyways, I bought the fabric at Jo Ann's, and its pretty adorable ♥


Anyways, I bought the fabric at Jo Ann's, and its pretty adorable ♥
The pattern is McCall's 4261 and its a snuggle fleece fabric. From laying out the fabric to putting the final touches, it was about 3 hours total... not bad for a pair of comfy pants ^.^
See ya later alligator!
Thursday, July 24, 2014
Anniversary Gift Box
My 3 year anniversary with my boyfriend recently passed and I wanted to incorporate something cute since all the gifts I got him were pretty random; I figured one could never go wrong with cute presentation, especially if its like a lift the flaps game :D
I work at Jo-Ann Fabrics so we get a lot of boxes and a lot if cardboard dividers within those boxes, which helped in making this :) Uhm.. the dividers kinda looked like this: (and you place them upside down at 90 degree angles to have them stay up and stuff)
I put them all in a box to make the compartments different sizes and it worked out pretty well. I got some labels, scrapbook paper, a glue stick, tacky glue, and very hefty scissors to cut the cardboard.
After I made the compartment sizes, I cut out the "flaps" which was cutting the cardboard to be as big as the compartment + some extra space to glue the back to the box.
 They're a little flimsy, but the box doesn't need to last forever!
As you can see from the picture above, I covered the cardboard BEFORE I glued the flap to the box, it helped the hassle alot. Oh yeah, tacky glue worked wonders with this project.
Afterwards came the decorating. As you should all know, I completely SUCK at painting, I am the messiest human being alive and me + paint = disaster. Yet, pinterest gave me some pretty good pointers :) I used the eraser side of a pencil, dipped it in paint, and made the polka dots on the side of the box (and to make the heart).

Then I painted the cover of the box, I thought this was going to be impossible until I found this blog on Pinterest: http://thatsmyletter.blogspot.com/2012/02/p-is-for-personalize-2.html
It taught me how to do any lettering and make it look absolutely amazing as you can see
 Just follow that tutorial and you'll be good to go :)
When the flaps were all done, it came out looking not to shabby if ya ask me!

Each label was like a little hint as to what was in the flap, but not enough to give it away...
So it would pretty much be "I love you for: your quirkiness ( i got him a wax vac because theyre cool in a way), simply being you (home baked cookies because the way to a guy's heart is always through food :P), always thinking things through (a shower curtain with the world map on it because why not think more in the shower), always doing your best (books because he's studying English), always wanting to solve problems (a 2x2 rubiks cube), and what you like, dislike, and everything in between (I got him the spray smellies for men from bath & body works).
Welp, I hope this idea works for one of you out there and helps you out when you need ideas for that special someone or really any gift in general! Good luck ;)
I work at Jo-Ann Fabrics so we get a lot of boxes and a lot if cardboard dividers within those boxes, which helped in making this :) Uhm.. the dividers kinda looked like this: (and you place them upside down at 90 degree angles to have them stay up and stuff)
 |
| My beautiful drawing |
I put them all in a box to make the compartments different sizes and it worked out pretty well. I got some labels, scrapbook paper, a glue stick, tacky glue, and very hefty scissors to cut the cardboard.
After I made the compartment sizes, I cut out the "flaps" which was cutting the cardboard to be as big as the compartment + some extra space to glue the back to the box.
As you can see from the picture above, I covered the cardboard BEFORE I glued the flap to the box, it helped the hassle alot. Oh yeah, tacky glue worked wonders with this project.
Afterwards came the decorating. As you should all know, I completely SUCK at painting, I am the messiest human being alive and me + paint = disaster. Yet, pinterest gave me some pretty good pointers :) I used the eraser side of a pencil, dipped it in paint, and made the polka dots on the side of the box (and to make the heart).
Then I painted the cover of the box, I thought this was going to be impossible until I found this blog on Pinterest: http://thatsmyletter.blogspot.com/2012/02/p-is-for-personalize-2.html
It taught me how to do any lettering and make it look absolutely amazing as you can see
When the flaps were all done, it came out looking not to shabby if ya ask me!

Each label was like a little hint as to what was in the flap, but not enough to give it away...
So it would pretty much be "I love you for: your quirkiness ( i got him a wax vac because theyre cool in a way), simply being you (home baked cookies because the way to a guy's heart is always through food :P), always thinking things through (a shower curtain with the world map on it because why not think more in the shower), always doing your best (books because he's studying English), always wanting to solve problems (a 2x2 rubiks cube), and what you like, dislike, and everything in between (I got him the spray smellies for men from bath & body works).
Welp, I hope this idea works for one of you out there and helps you out when you need ideas for that special someone or really any gift in general! Good luck ;)
Tuesday, July 15, 2014
Charmander Evolution Cross Stitched Backpack
I've started a loving, but sometimes tedious tradition of giving my boyfriend something hand-made for his birthday. I thought it added a little "from the heart" to the presents he gets :) The first was the Mario Blanket [after that, I never want to quilt again, especially without a rotary cutter] and this time it was this cross stitched backpack.

I couldnt quite match and find all the colors, but I did the best I could with that. As for copying it, I SUPER zoomed in to a section that I was working on, counted spots, and stitched from there. Plus, I excluded the green background because it wouldnt have matched with the black backpack.
I just found the DMC color chart I made for this! Here you go:
Hope you all like it! ♥
It took about 3 weeks to complete and a night to make the actual backpack itself. This was my first time cross stitching and I really wanted a pattern for this image but I could only work with what I had. So I ended up finding this picture on Mr. X-Stitch's blog and absolutely loved it!
.jpg) |
| This is his |
 |
| This is mine |
- Charizard
- Wings (dark): 3842
- Wings (light): 806
- Reflection orange (most of the face, etc): 971
- Body orange: 721
- Some of the random border: 3777
- Nails, eyes, etc: 3865
- Eye Color: 995
- Tummy Reflection: 3823
- Tummy Actual Color: 3856
- Inner Fire Yellow: 744 (I think?, I'm not sure if I changed this one or not)
- Outer Fire Orange: 971 or 741?
- Charmeleon:
- Body Orange: 721
- Reflection Orange: 606
- Random Border: 3777
- Eye Blue: 995
- Teeth, nails, eyes: 3865
- Tummy Reflection: 3823
- Tummy Actual: 3856
- Inner Fire: 3823 or 744?
- Outer Fire Orange: 741 or 971?
- Charmander
- Body Orange: 721
- Reflection Orange: 741
- Eye Blue: 995
- Teeth: 3865
- Random Border: 3777
- Tummy Reflection: 3823
- Tummy Actual: 3856
Hope you all like it! ♥
Tuesday, May 20, 2014
Cat Clutch
For all you cat lovers out there...I made this pattern for a cat clutch and put it all together; for making it from scratch, I honestly think it's pretty darn good lol, but opinions would be nice too :)
 It's a clutch, so it doesnt really hold a LOT but it can contain an appropriate amount.
I bought enough fabric to make about 10, so I think I'll alter the pattern a bit and make it fatter around the bottom to hold more.
 Once I get it at a good size, and see if people are interested in buying them, then I might invest in getting the metal closures to it could look a bit more fancy ;)

Let me know what you think! Or if you wanna buy one, I'll be trying to put it on my Etsy shop once I take better looking pictures, but leave a comment or e-mail me in the meantime :)
I bought enough fabric to make about 10, so I think I'll alter the pattern a bit and make it fatter around the bottom to hold more.
Let me know what you think! Or if you wanna buy one, I'll be trying to put it on my Etsy shop once I take better looking pictures, but leave a comment or e-mail me in the meantime :)
Monday, May 12, 2014
Book / Bible Cover (with zipper!)
For last christmas I made my mom and my aunt bible covers with this pretty asian looking fabric. The fabric is an absolute pain to work with unless you do it right (which I dont know how to) but it came out great anyways!
I bought a pink zipper to go along with it and a really pretty closing hook at Jo Ann Fabrics.
Inside its blue and has pockets for the front and back covers of the book. I also put in a pocket for post it notes, a night light, a pen, and a highlighter!
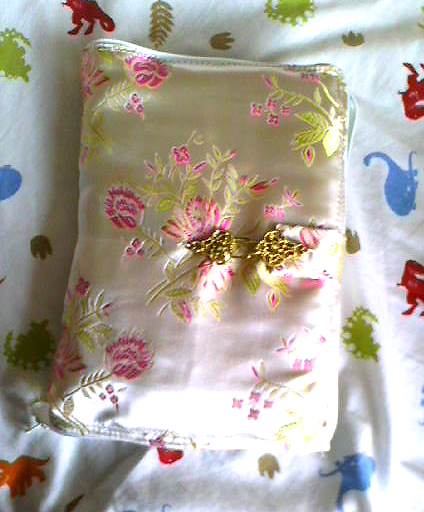 |
| Front Cover |
Inside its blue and has pockets for the front and back covers of the book. I also put in a pocket for post it notes, a night light, a pen, and a highlighter!
 |
| Inside |
Gear Shift Cover
I'm pretty sure I've searched everywhere for what these are called, but no luck whatsoever.
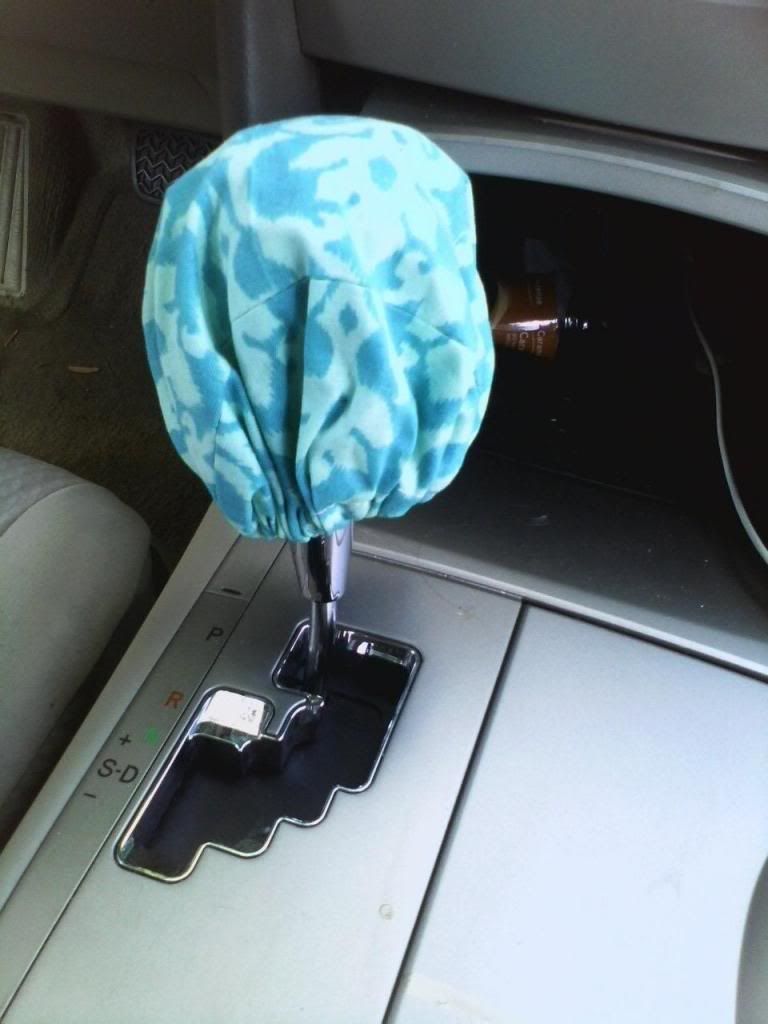 So I call them gear shift covers and am pretty happy with my little invention. I made it out of strips of fabric and elastic at the bottom. This one doesn't have any padding or grips inside (it doesnt really slip at all), but those can be added no problem :)
Accessorize your car ;)
Saturday, February 15, 2014
Mario Blanket
Well, I'm no quilter so I'll just call this one a blanket. But it's an 8-bit Mario design with random edges (that part was on purpose) and the flip side is a pac-man fleece blanket I bought somewhere at the mall. It's nice and warm ^^

Subscribe to:
Posts (Atom)